What is SNMP?
SNMP also known as “Simple Network Management Protocol” is an application-layer protocol used to measure and monitor the performance of the devices within a network. It helps the system administrator to ensure that networks stay up and running. Today, SNMP is one of the most popular networking protocols in the world. All modern manufacturers create SNMP-enabled devices that enterprises can use to obtain performance data from the devices.
How SNMP Works?
SNMP uses the device's Management Information Database (MIB) to collect the performance data. The MIB is a database that records information about the hardware and contains MIB files. The MIB resides within the SNMP manager designed to collect information and organize it into a hierarchical format. SNMP uses this information from the MIB to interpret messages before sending them onwards to the end-user.
There are different types of queries managers used to poll the information from the SNMP agent including, GET or GET-NEXT commands. The GET command uses the agent's hostname and Object Identifiers (OID) to obtain the information from the MIB. The GET-NEXT command obtains the data from the next OID.
What is SNMPWALK?
SNMPWALK is a command-line utility used to collect the information from remote SNMP-enabled devices including, routers and switches. It allows you to see all the OID variables available on remote devices. It sends multiple GET-NEXT commands to OIDs then the manager collects the data from all OIDs. SNMPWALK is a command-line utility that can be installed on Linux and Windows operating systems.
In this guide, we will show you how to install SNMPWALK on Windows and Linux. We will also explain how to use it to get the information from the remote devices.
Install SNMP and SNMPWALK on Linux
In this section, we will show you how to install SNMP and SNMPWALK on Debian and RPM-based Linux operating systems.
For RPM-based operating system including, RHEL/CentOS/Fedora, install the SNMP and SNMPWALK using the following command:
yum install net-snmp net-snmp-libs net-snmp-utils -y
For Debian based operating system including, Debian/Ubuntu, install the SNMP and SNMPWALK using the following command:
apt-get install snmpd snmp libsnmp-dev -y
Once the installation has been finished, start the SNMP service and enable it to start at system reboot with the following command:
systemctl start snmpd

systemctl enable snmpd
You can check the status of the SNMP with the following command:
systemctl status snmpd
You should get the following output:
● snmpd.service - Simple Network Management Protocol (SNMP) Daemon.
Loaded: loaded (/lib/systemd/system/snmpd.service; enabled; vendor preset: enabled)
Active: active (running) since Fri 2021-05-14 06:36:48 UTC; 3min 22s ago
Main PID: 36724 (snmpd)
Tasks: 1 (limit: 4691)
Memory: 8.7M
CGroup: /system.slice/snmpd.service
└─36724 /usr/sbin/snmpd -LOw -u Debian-snmp -g Debian-snmp -I -smux mteTrigger mteTriggerConf -f -p /run/snmpd.pid
May 14 06:36:48 ubuntu2004 systemd[1]: Starting Simple Network Management Protocol (SNMP) Daemon....
May 14 06:36:48 ubuntu2004 systemd[1]: Started Simple Network Management Protocol (SNMP) Daemon..
By default, SNMP does not allow retrieving all available SNMP information. So you will need to edit the SNMP default configuration file and make some changes so we can retrieve all information using the SNMPWALK command.
nano /etc/snmp/snmpd.conf
Find the following lines:
rocommunity  public default -V systemonly

rocommunity6 public default -V systemonly
And, replace them with the following lines:
rocommunity  public default

rocommunity6 public default
Save and close the file then restart the SNMP service to apply the changes:
systemctl restart snmpd
Now, open your command-line interface and print help information of SNMPWALK command as shown below:
snmpwalk -h
You should get the following output:
USAGE: snmpwalk [OPTIONS] AGENT [OID]
Version:  5.8

Web:      http://www.net-snmp.org/

Email:    net-snmp-coders@lists.sourceforge.net
OPTIONS:

-h, --help		display this help message

-H			display configuration file directives understood

-v 1|2c|3		specifies SNMP version to use

-V, --version		display package version number

SNMP Version 1 or 2c specific

-c COMMUNITY		set the community string

SNMP Version 3 specific

-a PROTOCOL		set authentication protocol (MD5|SHA|SHA-224|SHA-256|SHA-384|SHA-512)

-A PASSPHRASE		set authentication protocol pass phrase

-e ENGINE-ID		set security engine ID (e.g. 800000020109840301)

-E ENGINE-ID		set context engine ID (e.g. 800000020109840301)

-l LEVEL		set security level (noAuthNoPriv|authNoPriv|authPriv)

-n CONTEXT		set context name (e.g. bridge1)

-u USER-NAME		set security name (e.g. bert)

-x PROTOCOL		set privacy protocol (DES|AES)

-X PASSPHRASE		set privacy protocol pass phrase

-Z BOOTS,TIME		set destination engine boots/time

General communication options

-r RETRIES		set the number of retries

-t TIMEOUT		set the request timeout (in seconds)

Debugging

-d			dump input/output packets in hexadecimal

-D[TOKEN[,...]]	turn on debugging output for the specified TOKENs

(ALL gives extremely verbose debugging output)
Install SNMP and SNMPWALK on Windows 10 Windows Server 2016 and Windows Server 2019
In this section, we will show you how to install SNMP and SNMPWALK on the Windows operating system.
Follow the below steps to install SNMP on Windows:
Step 1 – Open the Control Panel as shown below:

Step 2 – Click on the Programs and Features you should see in the page below:
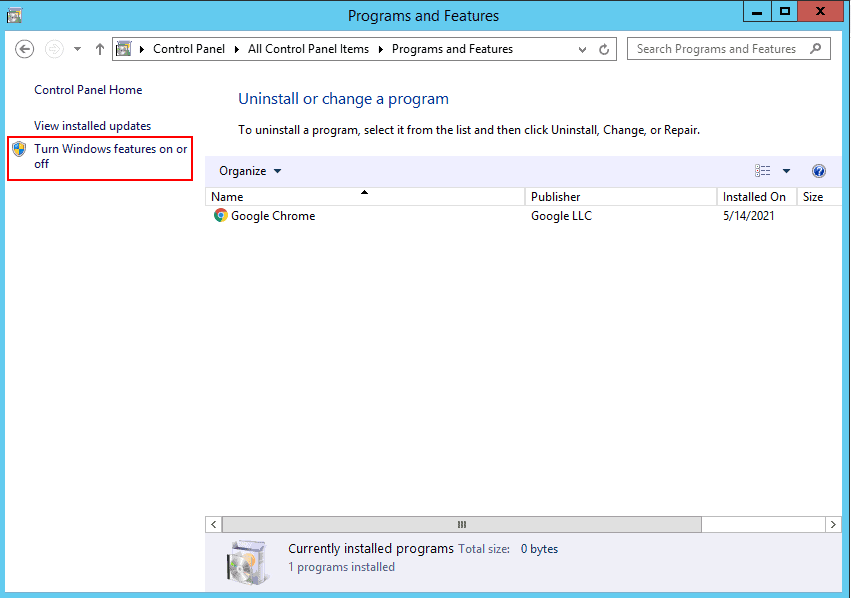
Step 3 – Click on the Turn Windows features on or off.
Step 4 – On Windows 10, select Simple Network Management Protocol (SNMP) and install it.
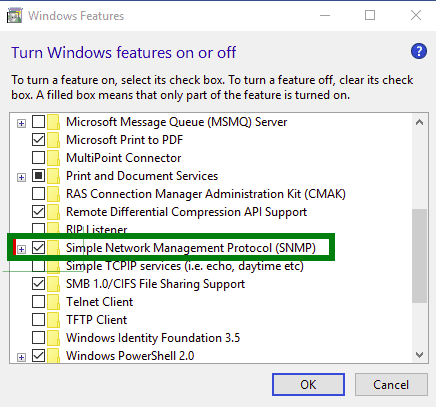
Step 5 – On Windows Server 2016 and 2019, click on the Add Roles and Features Wizard until you reach the Features section then select SNMP service.
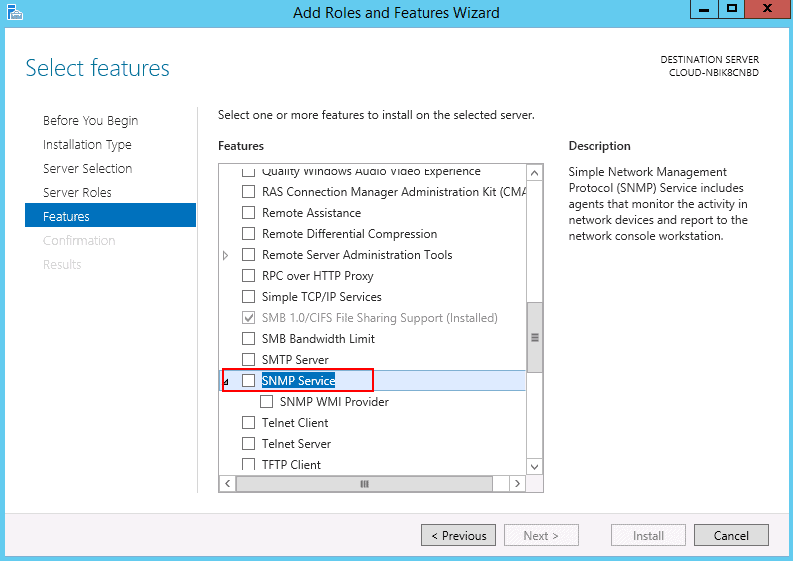
Step 6 – Install SNMP Service.
This will automatically install the SNMP service on your Windows system.
After installing SNMP, you will need to configure it.
Follow the below steps to configure the SNMP service:
Step 1 – Press Windows + R and type services.msc as shown below:

Step 2 – Press OK to open the Windows service configuration wizard.
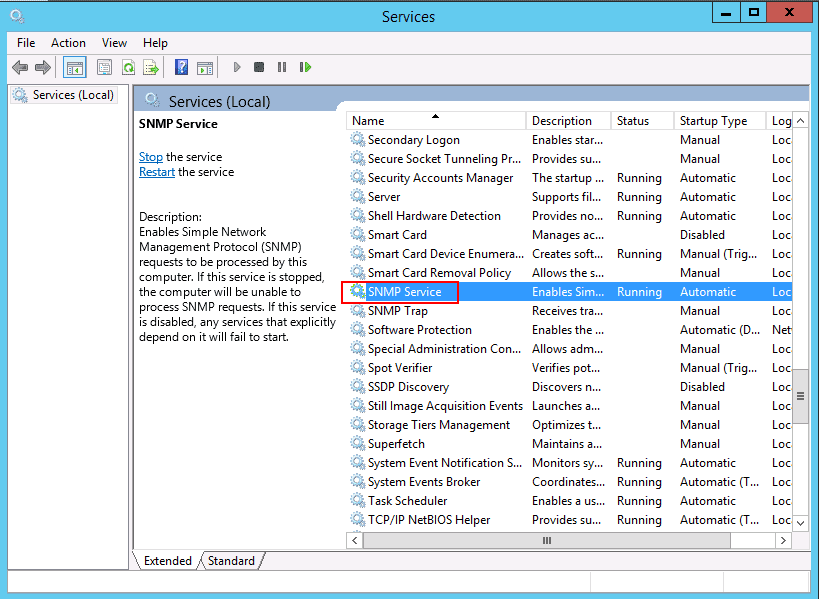
Step 3 – Select the SNMP service, right-click and click on the properties as shown below:
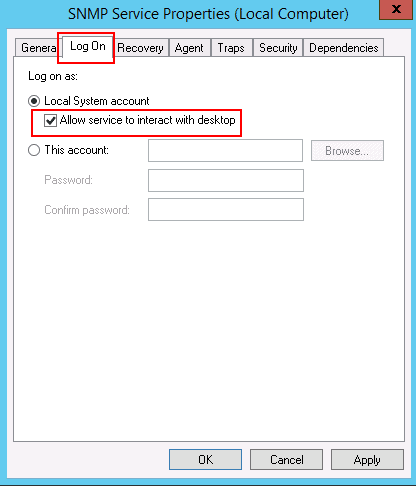
Step 4 – In the Log On tab, select “Allow service to interact with desktop”. Then click on the Agent tab as shown below:
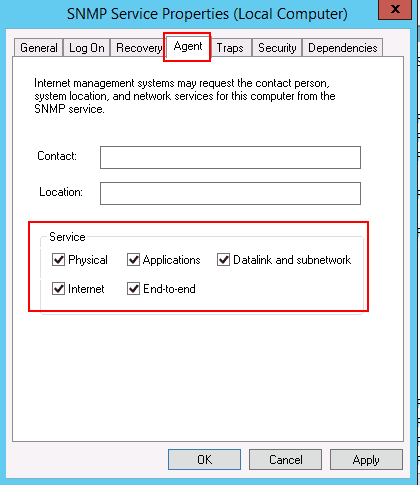
Step 5 – Select all services and click on the Security tab as shown below:
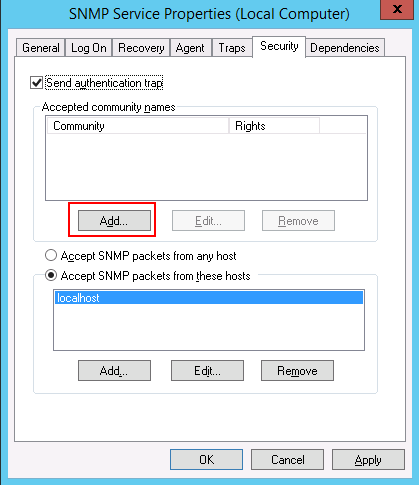
Step 6 – Click on the Add button. You should see the following screen:
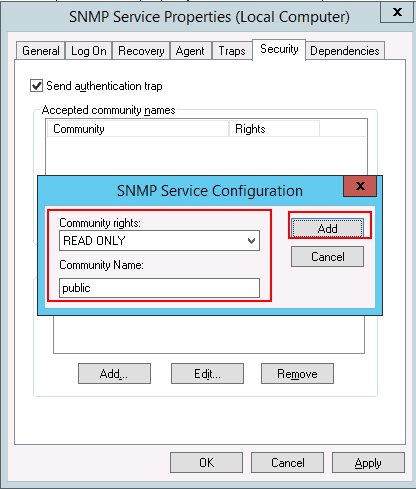
Step 7 – Provide community rights and community name then click on the Add button. You should see the following page:
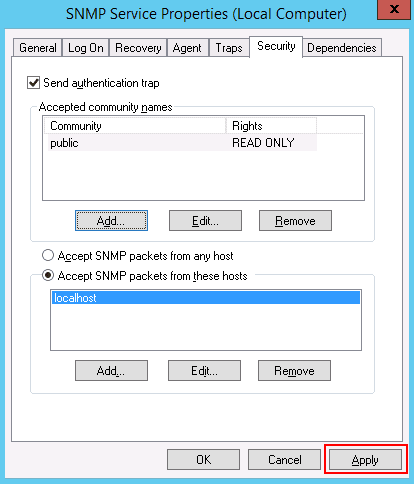
Step 8 – Click on the Apply button to apply the changes.
For full SNMP functionality, you will need to download the SolarWinds MIB Walk module from their Engineer's Toolset to your windows system. However, you can download the free snmpwalk files from the SourceForge website and follow along with this post.
Once SNMPWALK is downloaded, extract it to the download folder. You can now use snmpwalk.exe to launch and use the SNMPWALK.
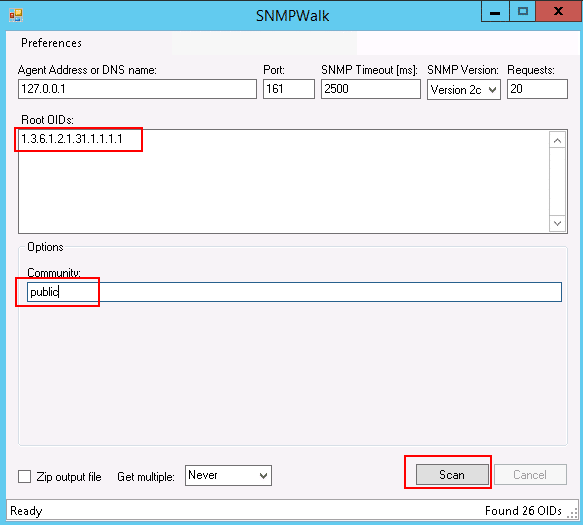
Provide your agent address, OID, community, and click the Scan button. This will generate a complete system information report based on the OID.
How to Use SNMPWALK to Retrieve the System Information
In this section, we will show you how to use the SNMPWALK command in Linux to retrieve the system information.
You can use the following options with the SNMPWALK command to retrieve the system information:
- -v: Specify the SNMP version.
- -c: Specify the community string which you have configured on the SNMP.
- hostname: Specify the hostname or IP address of the system where the SNMP agent is installed.
- OID: Specify the OID to return all SNMP objects.
Now, open your command-line interface and run the following command to list all existing OIDs on the network..
snmpwalk -v 2c -c public localhost
You should get the following output:
iso.3.6.1.2.1.1.1.0 = STRING: "Linux ubuntu2004 5.4.0-29-generic #33-Ubuntu SMP Wed Apr 29 14:32:27 UTC 2020 x86_64"

iso.3.6.1.2.1.1.2.0 = OID: iso.3.6.1.4.1.8072.3.2.10

iso.3.6.1.2.1.1.3.0 = Timeticks: (19907) 0:03:19.07

iso.3.6.1.2.1.1.4.0 = STRING: "Me <me@example.org>"

iso.3.6.1.2.1.1.5.0 = STRING: "ubuntu2004"

iso.3.6.1.2.1.1.6.0 = STRING: "Sitting on the Dock of the Bay"

iso.3.6.1.2.1.1.7.0 = INTEGER: 72

iso.3.6.1.2.1.1.8.0 = Timeticks: (3) 0:00:00.03

iso.3.6.1.2.1.1.9.1.2.1 = OID: iso.3.6.1.6.3.10.3.1.1

iso.3.6.1.2.1.1.9.1.2.2 = OID: iso.3.6.1.6.3.11.3.1.1

iso.3.6.1.2.1.1.9.1.2.3 = OID: iso.3.6.1.6.3.15.2.1.1

iso.3.6.1.2.1.1.9.1.2.4 = OID: iso.3.6.1.6.3.1

iso.3.6.1.2.1.1.9.1.2.5 = OID: iso.3.6.1.6.3.16.2.2.1

iso.3.6.1.2.1.1.9.1.2.6 = OID: iso.3.6.1.2.1.49

iso.3.6.1.2.1.1.9.1.2.7 = OID: iso.3.6.1.2.1.4

iso.3.6.1.2.1.1.9.1.2.8 = OID: iso.3.6.1.2.1.50

iso.3.6.1.2.1.1.9.1.2.9 = OID: iso.3.6.1.6.3.13.3.1.3

iso.3.6.1.2.1.1.9.1.2.10 = OID: iso.3.6.1.2.1.92

iso.3.6.1.2.1.1.9.1.3.1 = STRING: "The SNMP Management Architecture MIB."

iso.3.6.1.2.1.1.9.1.3.2 = STRING: "The MIB for Message Processing and Dispatching."

iso.3.6.1.2.1.1.9.1.3.3 = STRING: "The management information definitions for the SNMP User-based Security Model."

iso.3.6.1.2.1.1.9.1.3.4 = STRING: "The MIB module for SNMPv2 entities"

iso.3.6.1.2.1.1.9.1.3.5 = STRING: "View-based Access Control Model for SNMP."

iso.3.6.1.2.1.1.9.1.3.6 = STRING: "The MIB module for managing TCP implementations"

iso.3.6.1.2.1.1.9.1.3.7 = STRING: "The MIB module for managing IP and ICMP implementations"

iso.3.6.1.2.1.1.9.1.3.8 = STRING: "The MIB module for managing UDP implementations"

iso.3.6.1.2.1.1.9.1.3.9 = STRING: "The MIB modules for managing SNMP Notification, plus filtering."

iso.3.6.1.2.1.1.9.1.3.10 = STRING: "The MIB module for logging SNMP Notifications."
You can see the different OIDs in the above output. The typical format of an OID is shown below:
1.3.6.1.4.1.2021.10.1
A brief explanation of the most commonly used OIDs are shown below:
- 1 – ISO – International Organization for Standardization (ISO)
- 3 – org – Organizations according to ISO/IEC 6523-2
- 6 – dod – US Department of Defense (DOD)
- 1 – Internet protocol
- 4 – Private – Device manufactured by a private company
- 2021 – It is the particular device manufacturer number.
To get the hostname of the system, run the following command:
snmpwalk -v 2c -c public 127.0.0.1 .1.3.6.1.2.1.1.5
You should get the following output:
iso.3.6.1.2.1.1.5.0 = STRING: "ubuntu2004"
To get the hostname and kernel information, run the following command:
snmpwalk -v 2c -c public 127.0.0.1 .1.3.6.1.2.1.1.1
You should get the following output:
iso.3.6.1.2.1.1.1.0 = STRING: "Linux ubuntu2004 5.4.0-29-generic #33-Ubuntu SMP Wed Apr 29 14:32:27 UTC 2020 x86_64"
To get the network interface information, run the following command:
snmpwalk -v 2c 127.0.0.1 -c public .1.3.6.1.2.1.2.2.1.1
You should get the following output:
iso.3.6.1.2.1.2.2.1.1.1 = INTEGER: 1

iso.3.6.1.2.1.2.2.1.1.2 = INTEGER: 2

iso.3.6.1.2.1.2.2.1.1.3 = INTEGER: 3
To get the MAC address information, run the following command:
snmpwalk -v 2c 127.0.0.1 -c public .1.3.6.1.2.1.2.2.1.6
You should get the following output:
iso.3.6.1.2.1.2.2.1.6.1 = ""

iso.3.6.1.2.1.2.2.1.6.2 = Hex-STRING: 00 00 2D 3A 26 A4

iso.3.6.1.2.1.2.2.1.6.3 = Hex-STRING: 00 00 0A 3A 26 A4
To get a list of all network interface, run the following command:
snmpwalk -v 2c -c public 127.0.0.1 .1.3.6.1.2.1.31.1.1.1.1
You should get the following output:
iso.3.6.1.2.1.31.1.1.1.1.1 = STRING: "lo"

iso.3.6.1.2.1.31.1.1.1.1.2 = STRING: "eth0"

iso.3.6.1.2.1.31.1.1.1.1.3 = STRING: "eth1"
To get an IP address of the system, run the following command:
snmpwalk -v 2c -c public 127.0.0.1 .1.3.6.1.2.1.4.20.1.1
You should get the following output:
iso.3.6.1.2.1.4.20.1.1.45.58.38.164 = IpAddress: 45.58.38.164

iso.3.6.1.2.1.4.20.1.1.127.0.0.1 = IpAddress: 127.0.0.1
To get the Subnet Mask of the system, run the following command:
snmpwalk -v 2c -c public 127.0.0.1 .1.3.6.1.2.1.4.20.1.3
You should get the following output:
iso.3.6.1.2.1.4.20.1.3.45.58.38.164 = IpAddress: 255.255.255.0

iso.3.6.1.2.1.4.20.1.3.127.0.0.1 = IpAddress: 255.0.0.0
To get the CPU information, run the following command:
snmpwalk -v 2c -c public 127.0.0.1 .1.3.6.1.2.1.25.3.2.1.3 |grep -i cpu
You should get the following output:
iso.3.6.1.2.1.25.3.2.1.3.196608 = STRING: "GenuineIntel: QEMU Virtual CPU version 2.5+"

iso.3.6.1.2.1.25.3.2.1.3.196609 = STRING: "GenuineIntel: QEMU Virtual CPU version 2.5+"
To get the system load information, run the following command:
snmpwalk -v 2c -c public 127.0.0.1 .1.3.6.1.4.1.2021.10.1
You should get the following output:
iso.3.6.1.4.1.2021.10.1.1.1 = INTEGER: 1

iso.3.6.1.4.1.2021.10.1.1.2 = INTEGER: 2

iso.3.6.1.4.1.2021.10.1.1.3 = INTEGER: 3

iso.3.6.1.4.1.2021.10.1.2.1 = STRING: "Load-1"

iso.3.6.1.4.1.2021.10.1.2.2 = STRING: "Load-5"

iso.3.6.1.4.1.2021.10.1.2.3 = STRING: "Load-15"

iso.3.6.1.4.1.2021.10.1.3.1 = STRING: "0.00"

iso.3.6.1.4.1.2021.10.1.3.2 = STRING: "0.01"

iso.3.6.1.4.1.2021.10.1.3.3 = STRING: "0.00"

iso.3.6.1.4.1.2021.10.1.4.1 = STRING: "12.00"

iso.3.6.1.4.1.2021.10.1.4.2 = STRING: "12.00"

iso.3.6.1.4.1.2021.10.1.4.3 = STRING: "12.00"

iso.3.6.1.4.1.2021.10.1.5.1 = INTEGER: 0

iso.3.6.1.4.1.2021.10.1.5.2 = INTEGER: 1

iso.3.6.1.4.1.2021.10.1.5.3 = INTEGER: 0

iso.3.6.1.4.1.2021.10.1.6.1 = Opaque: Float: 0.000000

iso.3.6.1.4.1.2021.10.1.6.2 = Opaque: Float: 0.010000

iso.3.6.1.4.1.2021.10.1.6.3 = Opaque: Float: 0.000000

iso.3.6.1.4.1.2021.10.1.100.1 = INTEGER: 0

iso.3.6.1.4.1.2021.10.1.100.2 = INTEGER: 0

iso.3.6.1.4.1.2021.10.1.100.3 = INTEGER: 0

iso.3.6.1.4.1.2021.10.1.101.1 = ""

iso.3.6.1.4.1.2021.10.1.101.2 = ""

iso.3.6.1.4.1.2021.10.1.101.3 = ""
To get the system uptime information, run the following command:
snmpwalk -v 2c -c public 127.0.0.1 .1.3.6.1.2.1.1.3.0
You should get the following output:
iso.3.6.1.2.1.1.3.0 = Timeticks: (66282) 0:11:02.82
Conclusion
In the above post, you learned how to install and use SNMP and SNMPWALK on Windows and Linux to get the system information across the connected devices. I hope this will help you to monitor the network devices.
SNMPWALK FAQs
What is a snmpwalk tool?
SNMPWALK is a process of exploring the Management Information Base (MIB) structure of an SNMP report. The MIB has a tree structure that is denoted by a dot-notation number and the “walk” crawls through these numbers, recreating the tree. An SNMPWALK tool can construct a MIB tree by mapping the relationship between the values in a MIB. Each number that identifies a node on the MIB tree will have a label and a value. The OID (Object ID) is a reference code for the label.
Is SNMP v3 TCP or UDP?
All versions of SNMP use the same ports – there are two and they are both UDP. Regular SNMP transactions involve the SNMP Manager sending out a broadcasted request, to which the SNMP device agents reply with a MIB. This communication occurs on UDP port 161. The SNMP agent can send out a warning message without waiting for a request. This is called a Trap and it goes to UDP port 162.
What is OID in Linux?
OID is short for Object ID. It is the level code that identifies a node in a tree structure that is used for reporting in SNMP. An SNMP report is called a Management Information Base (MIB). It has a set number of fields that are identified by OIDs. The OID uses a dot-notation format to indicate the inheritance of a node on the tree.

