Group policies are an administrative tool that controls how programs and network resources work for specific computers and users within an Active Directory environment.
Checking group policy settings and troubleshooting them when needed is a big challenge, given the ever-increasing pace of users and computers. Before you realize the pace of growth, you'll have multiple group policy objects, and this can make management and troubleshooting a nightmare.
Further, it's handy to have reports that describe what and how settings are applied.
A single solution for all these requirements is the Resultant Set of Policy (RSoP).
What is RSoP?
RSoP is a built-in Microsoft tool that gathers information about the existing group policy settings, including the order in which they were applied, to help you understand the impact of these policies. It also throws light on the impact of a policy on a combination of users and computers.
RSoP checks the existing policies based on the site, domain, organizational unit, etc., collects information from them using the Common Information Management Object Model (CIMOM), and presents the same in the form of an easy-to-understand report.
A clear advantage of RSoP is its reports.
Sometimes, the group policy settings of a site, domain, and organizational unit can conflict, making it hard for you to determine the exact effect of a policy. But RSoP handles this conflict by providing the order in which policies were applied and the impact of each policy accordingly, so you can easily understand the effect of a policy, regardless of which level it is applied to.
RSoP Modes
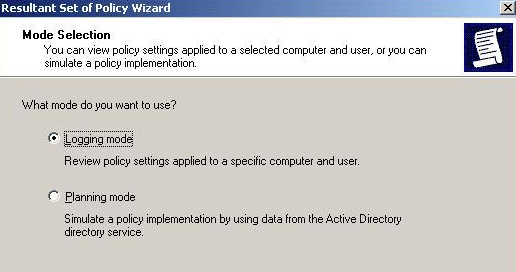
RSoP has two modes, namely, logging and planning.
The logging mode generates reports on the current policy settings of users and computers, so you can accordingly decide why some policies are not working. It also makes it easy to decide which policies must be removed or modified.
On the other hand, the planning mode helps to create a “what if” scenario to help test the effect of a policy so that you can decide on its implementation.
Using RSoP to Check Group Policy
There are two ways to check group policy using RSoP – one is through the MMC console, and the other is to use rsop.msc.
Here is a step-by-step guide for both options.
MMC Console
- Click the Windows button (Start menu) and Run
- Type MMC and click ok
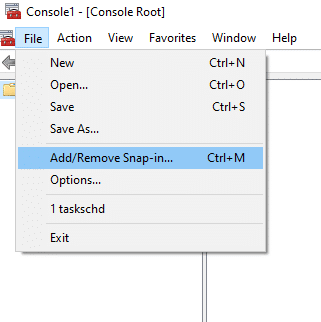
- When the console opens, select File > Add/Remove Snap-In
- In the Add Standalone Snap-in window, select Resultant Set of Policy and press Add
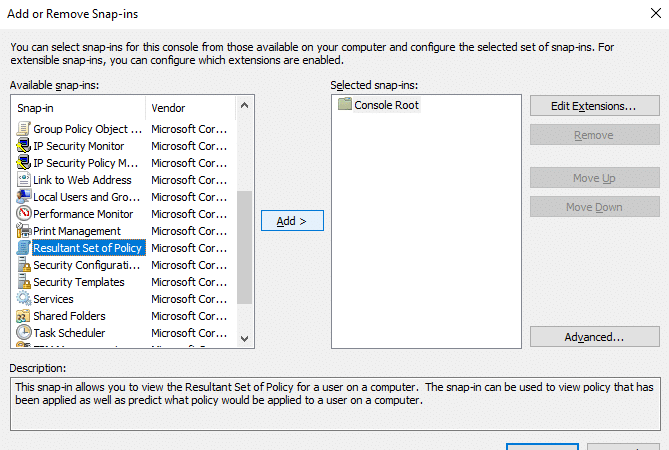
- Click Ok
- Next, look for the Resultant Set of Policy on the left-hand pane below the Console root
- Right-click and select Generate RSoP Data
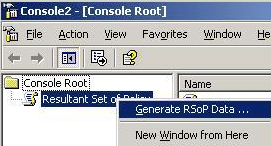
- This opens the RSoP wizard, and click Next to continue
- In the next window, choose if you want the logging or planning mode
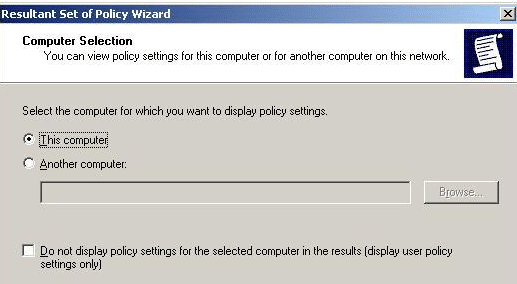
- In the next window, mention the computer you want to run RSoP. It can be the computer you're using or a different one
- Similarly, in the next window, select the user. Again, it can be the current user or a different user for the chosen computer. Based on your previous selection, the relevant list of users for the selected computer is displayed, so you only have to choose from a list.
- Finally, review the settings, click Next, and wait. Once RSoP is done processing, you will be notified, and after that, exit the wizard.
To check the data, go to your MMC console, and you'll see user and computer configuration on the left-hand pane. The corresponding settings are on the right-hand pane, so simply click them to access the information you want.
Note that RSoP displays only the policy settings and doesn't show the group policy objects. So, check these policies to understand what settings have been applied.
Go back to MMC and verify if the policies reported by RSoP are being applied or not.
Rsop.msc
If the earlier option looks cumbersome, the easier way is to open the Run dialog (Windows + R keys) and type in rsop.msc.
You will see a pop-up window as it can take a few minutes to query the group policy. After the querying is done, you can see the group policy settings applied.
A key difference in the above two methods is flexibility in querying. With rsop.msc, you can see only the settings applied to your machine and user account. In contrast, you can query group policies used for different computers and different users within the same computer with the MMC console.
Thus, you can use RSoP to check group policies to understand their impact and make changes accordingly. Choose from either of the above methods depending on your preferences and the device/user you want to check.
Checking Group Policy
While RSoP is the most convenient way to check group policies and ascertain their impact, there are other ways to check this impact.
Let's now look at a few other ways to check the group policy.
1. gpresult
gpresult is a command-line tool to check the group policies. However, by default, it displays the settings only for the computer and the user who is logged in.
For remote computers and different users, you have to specify the computer and usernames as a part of the command.
Here are a few examples of how you can use gpresult.
gpresult /s ctmain /u main\lr /p test1234 /user targetusername /scope user /r
The above command retrieves RSoP data for the remote user named “main\lr”, who is on the computer “ctmain” and has the password “test1234”
You can also save the RSoP data to a file for further processing and future reference. To do that,
gpresult /s ctmain /u main\lr /p test1234/user targetusername /z > lrpolicy.txt
2. Local Group Policy Editor
Your Local Group Policy Editor can give information about the group policies applied to your computer. In particular, you can see the Enabled, Disabled, and Not Configured policies as well.
Here's how you can use it.
- Press Windows + R to open the Run dialog. Type gpedit.msc to open the Local Policy Editor.
- Navigate to the left-hand side when the editor opens and expand Computer Configuration > Administrative Templates > All Settings.
- The policies will be displayed on the right-hand side pane. Here, you can see each setting and its state. You can even sort it by the state.
Alternatively, right-click on Administrative Templates and choose Filter Options from the menu. Then, select “Yes” in the Managed and Configured options when a window opens. This will display all the policies that are Enabled. Then, you can explore the other filter options to get to the policies you want to view.
3. ManageEngine ADManager Plus – FREE TRIAL
You can also check the group policy with third-party tools such as ManageEngine ADManager Plus.
With this tool, you can view all the available group policy objects in a domain, or you can see just those associated with a specific site or organizational unit.
For both the group policy information, open the tool, and navigate to the “AD Mgmt” tab, and under the “GPO Management” section, click the “GPO Management” link. This will open the “Group Policy Management” pane on the left-hand side and next, click on “All Domains” to see all the configured domains.
From hereon, navigate to the domain, site, organizational unit, or container you want, and you should be able to see the linked GPOs.
Thus, these are other ways to check the group policy in an AD environment. You can access a 30-day free trial.
Conclusion
To conclude, group policies are a powerful administrator tool that controls the way users and computers can access network resources. However, they can get unwieldy and conflicting when your network expands, so you need to stay on top of which policy updates apply to different computers/users so that you can understand their impact.
RSoP is the most convenient way to check the group policies and their impact on different computers and users. You can leverage RSoP and the reports it generates through the MMC or rsop.msc.
Besides this, you can use gpresult, local policy editor, and even third-party tools like ManageEngine to gather this information and decide if a particular policy should be continued or removed.
If you found this guide interesting, make sure to check other such informative guides on our site!

