Mapping network drives is very useful for accessing files over the network. Setting these connections up manually is not the most practical solution though because after your computer restarts you will need to recreate the connection. One solution is to create login scripts for the computers on your network to use.
This works fine for smaller networks, but when you have hundreds of computers to load scripts onto it becomes an issue.
The solution we will be looking at today is to use Group Policies to accomplish this instead.
This option lets you leverage the power of your network’s capabilities to run drive mapping functions in the background. This isn’t the only way to accomplish this kind of result, but it is definitely one of the best ways to get it done in an Active Directory environment.
One of the key advantages of this method is that it is very easy to setup and it requires almost no scripting experience. We will look at a few different implementations of this idea, for both single users and for groups within Active Directory.
We will also look at other determining characteristics of each mapping instance such as the OS of the computer, Organizational Unit membership, and more.
Logon Scripts Or Group Policy?
The only way to get a mapped network drive in the past was by creating a login script. This was traditionally a command such as net use x: \\server\share wrapped up in a simple batch file and placed in the user’s ‘startup’ folder.
All items in this folder such as executables, batch files and shortcuts to programs, will launch when a user logs into their Windows PC.
Startup Scripts work great if you have an optimal network with no connectivity issues, but there can be bigger issues.
Logon scripts can cause slow boot times when there are problems resolving the network communications, making the user wait while the script either finishes or fails.
For this reason, most administrators prefer using group policies to accomplish the same thing, mapping drives, but in a more streamlined and uniform way through Group Policies.
There are instances where more command intensive scripts need to be run, like a PowerShell script, so running start-up scripts make more sense in these scenarios.
The main reasons that you would want to map network drives with a group policy are:
- It is simple to set up and requires no need to understand how to write scripts. There are a few simple graphical boxes to click on and select, then a button to enable or disable the options.
- It is suitable for all sized environments and can accommodate your users even when your company grows larger.
- It can be tailored to your specific requirements.
- It is not difficult to do.
We will look at the 2 different methods of mapping your drives below.
Scenario 1: Map Network Drive with a Group Policy
Item level targeting is a form of Group Policy Drive Mapping and is commonly used. We will map a network drive and look at the steps needed to get this up and running. We will use the OU details as an Item Level Target for our mapping, but Security Groups can also be used to select targeted users and groups, allowing for a more granular type of drive mapping and file sharing.
1: Create & Configure the test GPO
First you will need to open the Group Policy Management Console

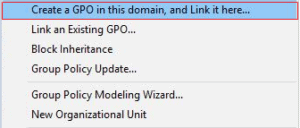
Then once you have opened-up the Group Policy Management Console, you will need to Right Click and then Select the option that reads ‘Create a GPO in this domain and Link it here’. In this example we will be using a user-based GPO which means that we have to ensure that we link the GPO to the correct location. This means that we also be targeting the users that we wish to give access to. We’ve got all of our users in an OU, so we will be adding them.
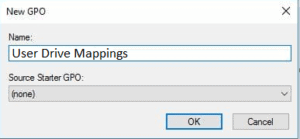
After we’ve done this, we will need to allocate a name our new GPO. We can call it whatever we want but in this case I called it User Drive Mappings. The great thing about this method is that we can later add additional drive mapping onto the same GPO, which we will actually do with individual user drive mappings for home directories.
As we can see, the new GPO has been created and the link has been setup. We can now move on to configuring other settings.
2: Configure Our GPO Settings
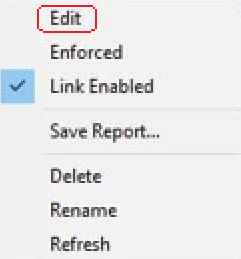
Next we need to right click on the GPO and then click on edit.
Afterwards you will need to navigate through User Configuration, then Preferences, then Windows Settings, and then Drive Mappings.
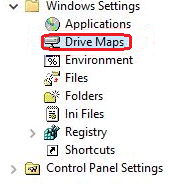
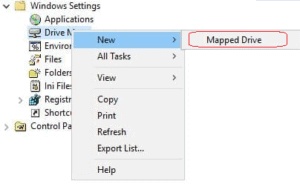
After that you need to right click on Drive Mappings, then click on Select New, and then click on Mapped Drive.
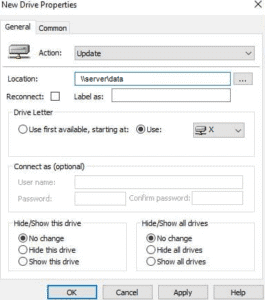
Next we need to configure Drive Mapping Properties
We will be working in the General tab of this window, and the following details have to be entered into the following forms.
- We need to type in the path to your network share in the ‘Location’ form
- Select a drive letter from the drop-down box
- From the top drop-down box click the ‘Update’ option
- If you want to enter a label then you can enter that as well but it is not essential
Next, click on the ‘Common’ tab so that we can edit the settings in there. Click on the “Run in logged on users’ security context” option in order to make this work properly.
Then we will have to select the Item-level Targeting option and then click on the ‘Targeting’ button.
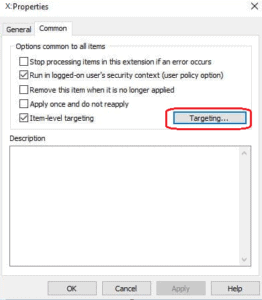
Choose New Item and then choose the Organization Unit we want to use.
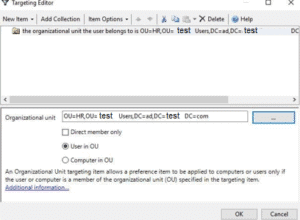
To finish, click Ok. We are done with the configuration.
3: Restart the PCs on your Network to run the new GPO
In order for the new GPO to run we will need to restart the computer. You can also run the command gpupdate /force from the command line in Windows. To access the command line click on ‘Start’ and type in cmd and then press ‘Enter’. You can now run the command and force the update to process the new GPO that we have created. After the PC has rebooted, we will log in with a user that is from the OU that we originally targeted. We will see a new mapped drive in showing up in the computer’s hard drive selection under ‘This Computer’.
We can now access this mapped drive whenever we log in with these credentials. Logging in with another user from a different OU will not map the drive, giving us layered control over our drive mapping resources, which is both convenient and more secure. To give access to this mapped drive, a user will need to belong to the same OU that we granted access for in the Security Group.
Scenario 2: Let’s Use a Group Policy to Map a Drive for a Single User
What we will do here is map a user drive, also called a home drive in some organizations. This is a mapped network drive that is private for each user and allows them to work on files while logged onto the network. It provides security and convenience for the user as the threat of theft of the computer or laptop will not affect the data that the user normally accesses. This is because the data is usually stored on a secure server within the organization.
We could look at creating a new GPO from scratch, or we can add this new policy to an existing one. In our case we can just add to an existing GPO for demonstrative purposes. To make this work, we will need to have a folder created for the user with the correct permissions on the network. Because this is a home folder, we need to make sure that nobody else can access its contents, due to privacy considerations.
1: Map the Drive
These are the settings that the user needs to map a drive.
In order for us to make this work for each individual user that logs on, we need to use a variable. In this case, the percentage signs encase the UserName variable and will pull the data for each user that logs onto the system. The script will create the folder that corresponds with the username, and grants access to the folder at the same time.
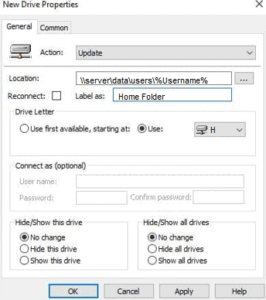
And just like that we have created a new user drive mapping.
All that is left to do is to have the user log off and log back on again. The home folder will now show up under the Devices and Drives window and it will be labelled as the H drive.
Our user now has access to the department’s mapped drive, and their own personal data too. Easy peasy.
Conclusion
We have learned just how simple it is to get mapped network drives automated via a simple GPO configuration. We don’t need to know how any scripting works or rely on potentially system slowing scripts. This is great news if you don’t feel like typing out all of these commands for each user in your organization, especially if you have hundreds of people working there. That is a huge time saver. The way that we have configured everything means that a new user that joins the organization will have their H drive mapped out automatically, and the departmental drive will automatically be assigned based on the OU membership of the user.
An Alternative to Manually Monitoring Active Directory is
SolarWinds Server and Application Monitor (SAM)
SolarWinds has created a whole host of different applications to help you keep tabs on your operational environments, and SAM is the gold standard to monitor your Active Directory setup on the network.
Key Features:
- Uptime Monitor and Downtime Tracker: The SAM tool helps users keep an eye on essential hardware health metrics like fan speed, power supply, and server temperature to ensure that all the devices work fine.
- SSL Certificate Management: The tool checks the status of your web server's SSL certificates and sends alerts for expiration dates, allowing you to stay updated about when the certificate expires to have a secure connection.
- Server Operating System Services: From the Distributed Transaction Coordinator to Disk Queue Length, you can monitor critical components proactively address performance bottlenecks, and take advantage of optimized server performance.
- Server Diagnostic Tool: The user can get useful recommendations according to a custom template as the tool automatically scans your network hardware.
It is also ideal for keeping a watchful eye over mission critical apps, data bases and services. It is a proactive solution that detects common Active Directory issues without the hassle and intensive setup on log management software such as SCOM.
Pros:
- Office 365 Monitoring: The tool provides reports on the status and availability of your Office 365 environment. This allows users to track portal health, subscription status, and security statistics over time.
- IIS Server and Website Performance Monitoring: Easily monitor the performance of IIS servers and websites, including app pool performance. Tools like Server & Application Monitor (SAM) and Server Configuration Monitor to have detailed insights.
- Response Time Monitoring: Monitor the response time of servers, applications, and networks using over 1200 application templates. You can also create custom monitoring templates tailored to your specific needs.
- Email Monitoring: Insights into email service behavior are offered by built-in mail server monitors, which test successful email delivery and round-trip times for different mail protocols.
Cons:
- Cluttered UI and Customization: Some users previously reported issues with the UI, which seems cluttered and troubles users when customizing and assigning roles or access.
SAM comes with built in support for Virtual Machines and much more! Start with a 30-day free trial.
Map Network Drives With Group Policy FAQs
How can Group Policy be used to map network drives?
Group Policy can be used to map network drives by configuring a Group Policy Object (GPO) that specifies the network drive location and mapping settings.
How do I create a Group Policy Object for mapping network drives?
To create a Group Policy Object for mapping network drives, you can use the Group Policy Management Console (GPMC) or the Group Policy Object Editor (GPOE) in the Microsoft Management Console.
What types of network drives can be mapped with Group Policy?
Group Policy can be used to map a variety of network drives, including drives hosted on Windows file servers, Linux servers, and network-attached storage (NAS) devices.
How can I map network drives using Group Policy Preferences?
Group Policy Preferences is a feature of Group Policy that allows administrators to configure drive mappings using a graphical interface. To map a network drive using Group Policy Preferences, you can create a new GPO and configure the Drive Maps preference item.
How can I map network drives based on user or group membership?
You can map network drives based on user or group membership by configuring the Group Policy Object to apply only to specific users or groups, and specifying the network drive mapping settings for those users or groups.
Can network drive mappings be updated or removed using Group Policy?
Yes, network drive mappings can be updated or removed using Group Policy by modifying or deleting the corresponding GPO or preference item.
How can I troubleshoot network drive mapping issues with Group Policy?
To troubleshoot network drive mapping issues with Group Policy, you can review Group Policy processing logs, verify network connectivity, and ensure that the network drive location and mapping settings are configured correctly.
What are some best practices for mapping network drives with Group Policy?
Best practices for mapping network drives with Group Policy include configuring drive mappings based on user or group membership, using Group Policy Preferences for drive mappings, and using security filtering to limit the scope of the GPO to specific users or groups.
How can I test network drive mappings with Group Policy before deploying to users?
You can test network drive mappings with Group Policy by creating a test GPO and applying it to a test computer or user account. You can then verify that the network drive mappings are configured correctly and functioning as expected.

