Businesses take modern business operations relatively seriously and, for this purpose, implement numerous services or tools for these servers. Earlier, file serving introduced networking to several organizations and continues to remain on the top in the list of business requirements. However, the file server is only the core function handled by the server. There are multiple administrative challenges and efforts as well.
Moreover, Windows Server 2008 does not include file service features, which is good. With Windows Server 2008, Microsoft has significantly improved the role-based capabilities of Windows Server and protects the operating system from attacks. However, if you want to add a file service role, you need to follow the following steps:
Step 1 – Begin by moving to the Server Manager.
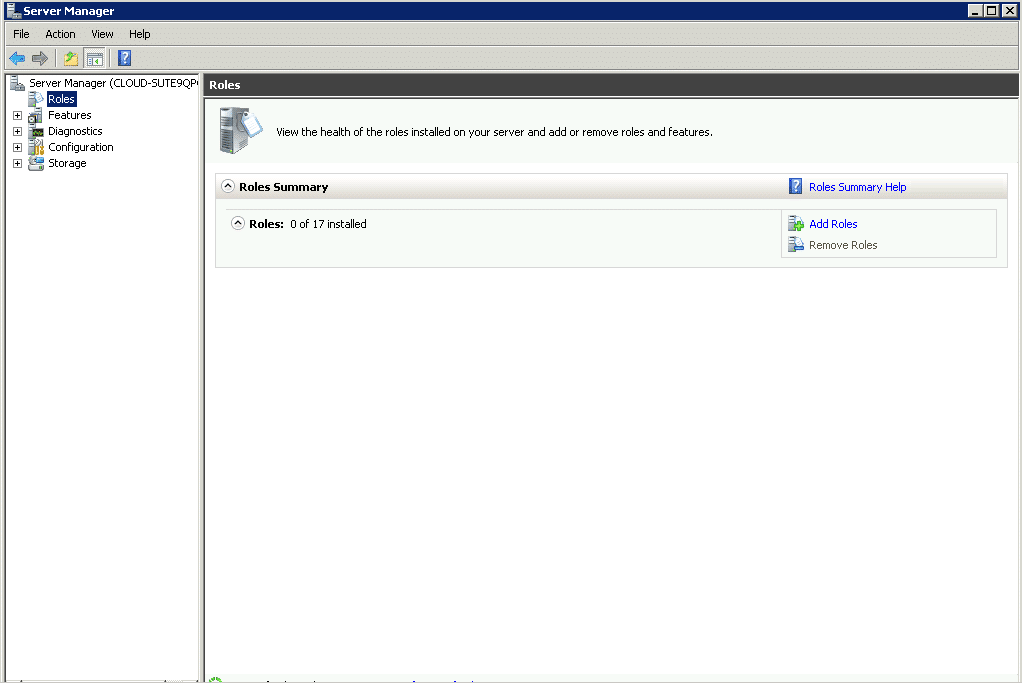
Step 2 – Then, select the Roles option from the navigation pane. Role information will appear in the work pane.
Step 3 – From the role information, click on add roles. A select Server Role Dialog Box will appear.
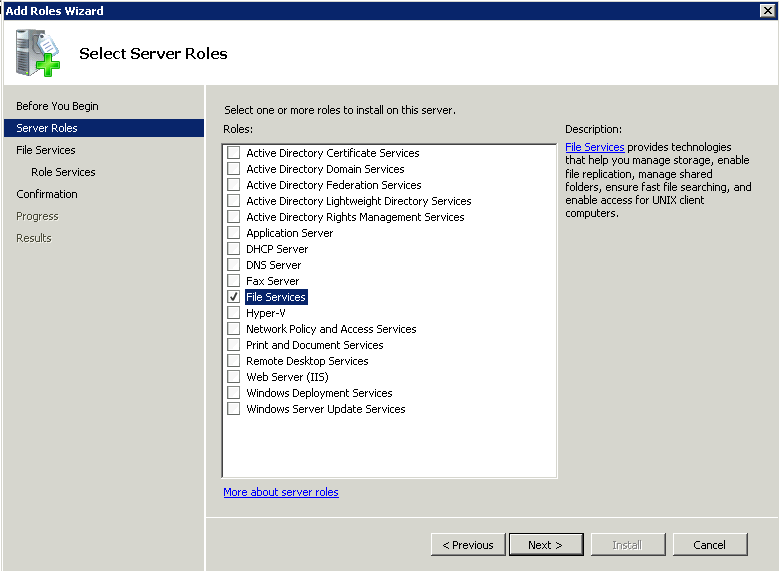
Step 4 – From that dialog box, choose the File Services and click the Next button.
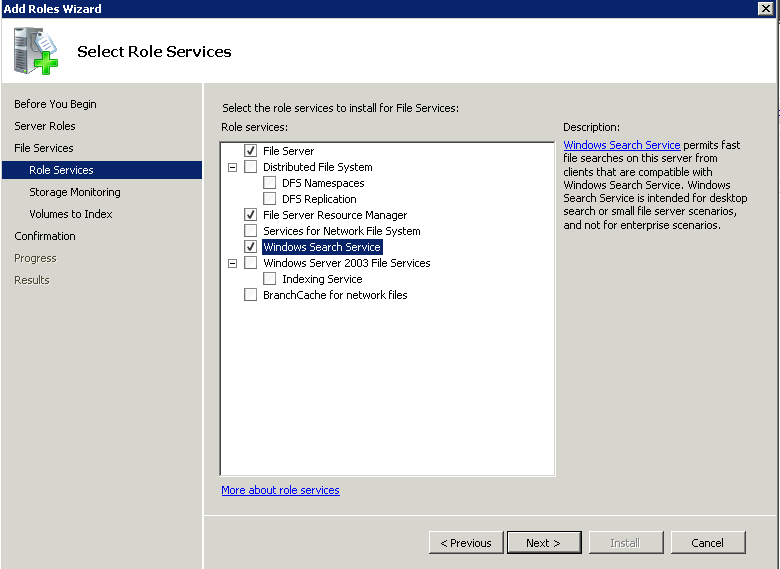
Step 5 – Next, select the File Server Resource Manager option along with the required File server services.
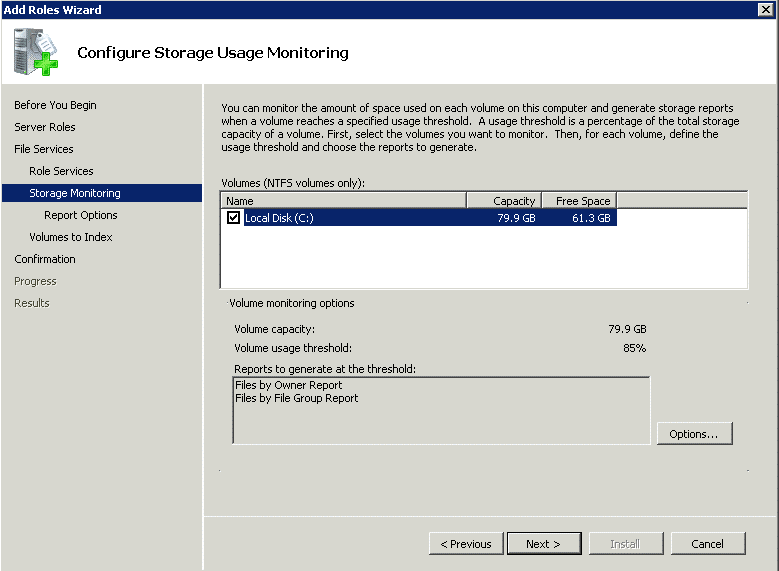
Step 6 – Then, decide the type of volume you want to use for monitoring. You can also make necessary changes to the reports using the option buttons.
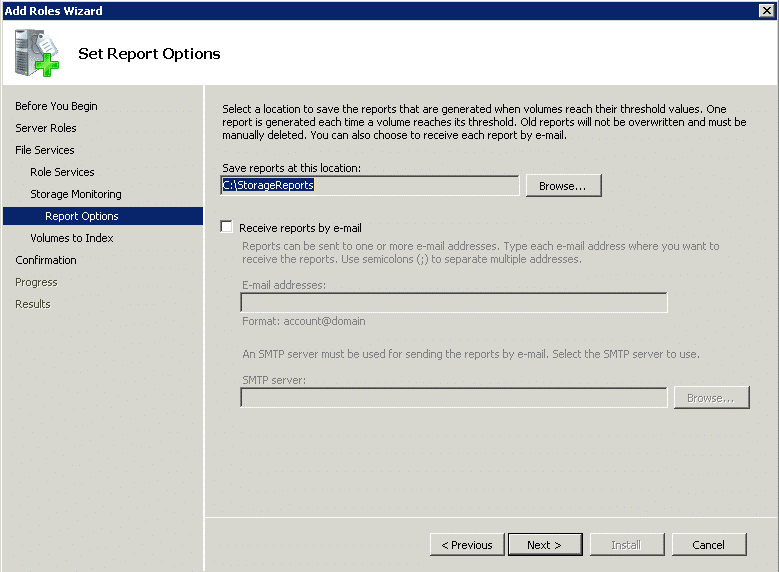
Step 7 – Now, choose the location where you want to store your report from the Set Report Option Screen.
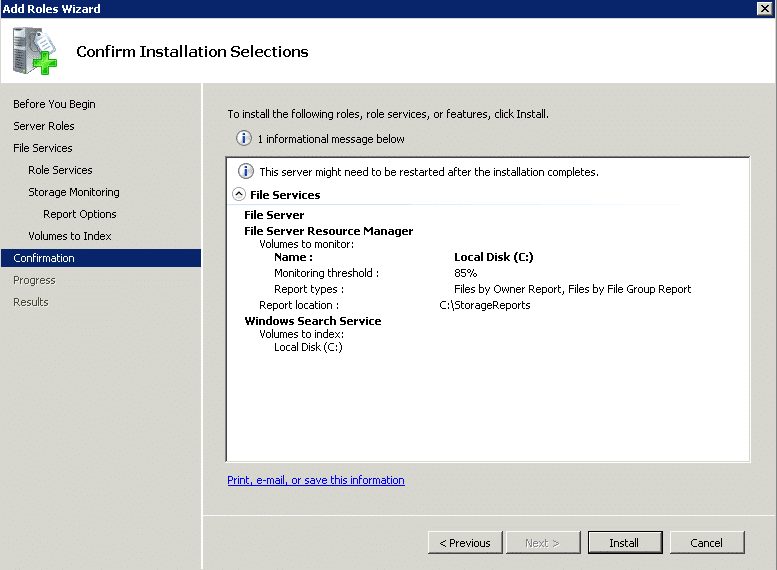
Step 8 – Lastly, click the install button given on the confirmation window to add the File Services role.
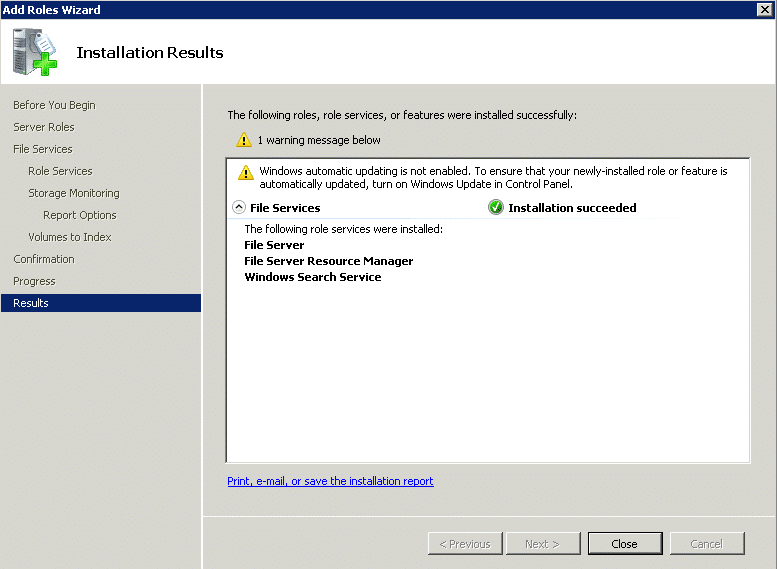
After following the steps, you will notice that the File Service Role, File Service Resource Manager, and the Share and Storage Management tools have been installed. In this blog, we will discuss the Share and Storage Management tool that replaced the File Management Tool available in Windows 2003.
Capabilities of Share and Storage Management Console
Along with Window Server 2008, Microsoft has also renovated the File Services Role to Share and Storage console. The sole reason behind this renovation is to make the storage volume and shared folders management effortless for the administrators. They enable them to accomplish the following administrative tasks such as:
- Adding and removing disks and volumes from the server.
- Securing access to the shared resource is based on numerous factors.
- For example, allowing or disabling shared access to server resources, including files, folders, and volumes.
- Viewing the details of the users accessing the resource and immediately disconnecting them if found something suspicious.
Now, you might be wondering how it can be done? Well! Let’s move further to discuss the step-by-step guide of all the above-mentioned administrative tasks with you.
Step-By-Step Guide Of Administrative Tasks
To Add Storage to a File Server
The need for storage is increasing consistently. It is because of the increase in the information in the hierarchical storage systems. So, to avoid burgeoning of this information, it is significant to add them to a file server. If you are using a RAID controller, it is advisable to follow its instructions. However, you can even follow the steps given below:
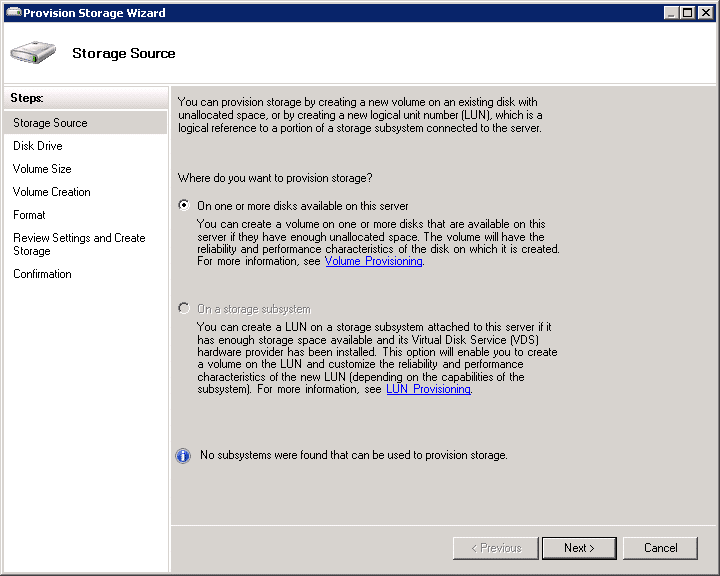
- First, select Provision Storage from the Share and Storage management console. Next, you will notice a wizard that will help you go through the steps required to make the hard disk active.
- The first screen of the wizard will ask you to select a location where you want your storage to be operated. It is recommended to choose the first option if you have attached your server to the local disk. First, however, select the On a Storage Subsystem option if it is located on a Fibre Channel or iSCSI SAN.
- Then, choose the drive that you want to add to the server from the Disk Drive option of the Wizard.
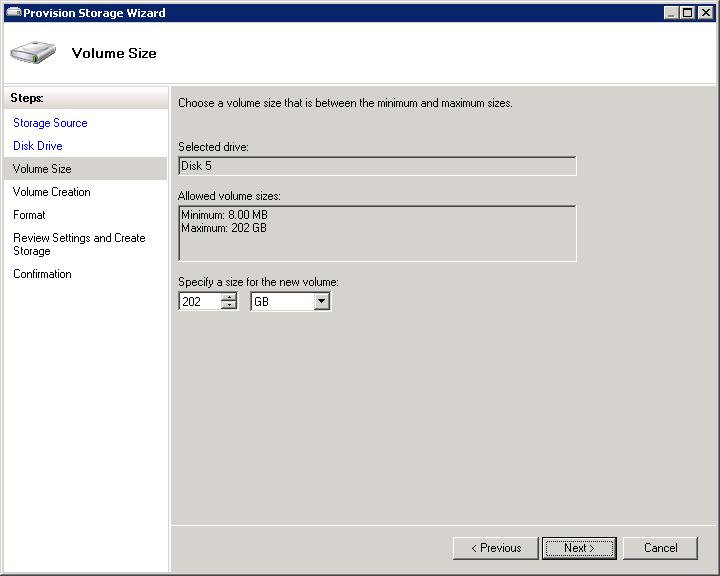
- Now that you selected the disk you want to add, it is time to choose the space required for your new volume. You can acquire multiple logical volumes for each physical disk.
- Now, move ahead to the Volume Creation Screen. In this, you have to decide how you want to mount this volume on your server.
- Lastly, you also have to decide to format the volume before adding it to the File Server. And, if you do so, you also have to determine the unit size of the allocation.
After making the appropriate selection, review the settings and click on the Create Button. You will see your action in progress in the Wizard. After it is completed, the next step is to choose the Volume tab from the work pane.
To Add and Secure Shared Resource To The Server
Previously, you might have seen a list of the resources shared by default on the Windows Server 2008 server with File Services installed. You might have wondered why these resources are shared by default, and your default subscriptions may vary slightly depending on your configuration. It is because of:
- Admin$, a share that points to the location on the server where Windows 2008 server was installed.
- C$, every share on your server is shared through an administrative claim, usually denoted by a $ after the drive’s name.
- IPC$, also known as Inter-Process Communication, is a share that allows communication between processes and computers.
- NETLOGON is used for user authentication on domain controllers.
- SYSVOL, which enables you to distribute group policy information between domain controllers.
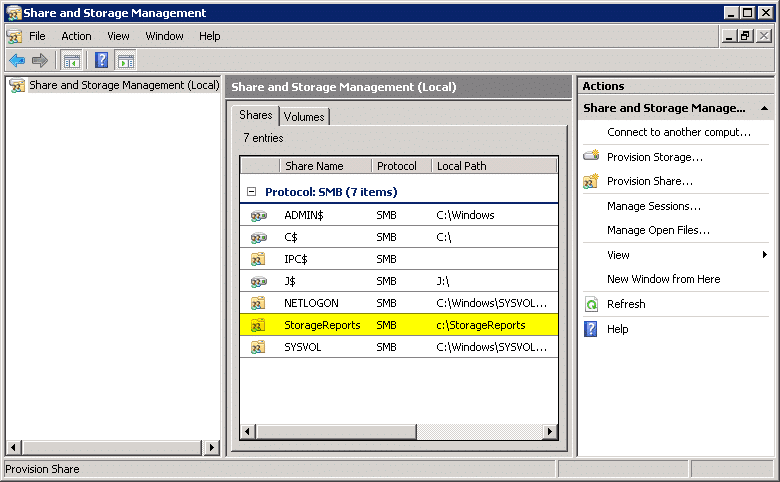
Alike adding storage to the File Server, Microsoft has facilitated a wizard for adding shares to a Windows Server 2008-based file server. It enables you to add shares traditionally with the help of Windows Explorer. However, you can easily do this using the Share and Storage Management Tool. To achieve this goal, do the following:
- First, you need to start a Wizard by choosing Provision share from the Action Pane.
- You will be asked to specify the location you want to share.
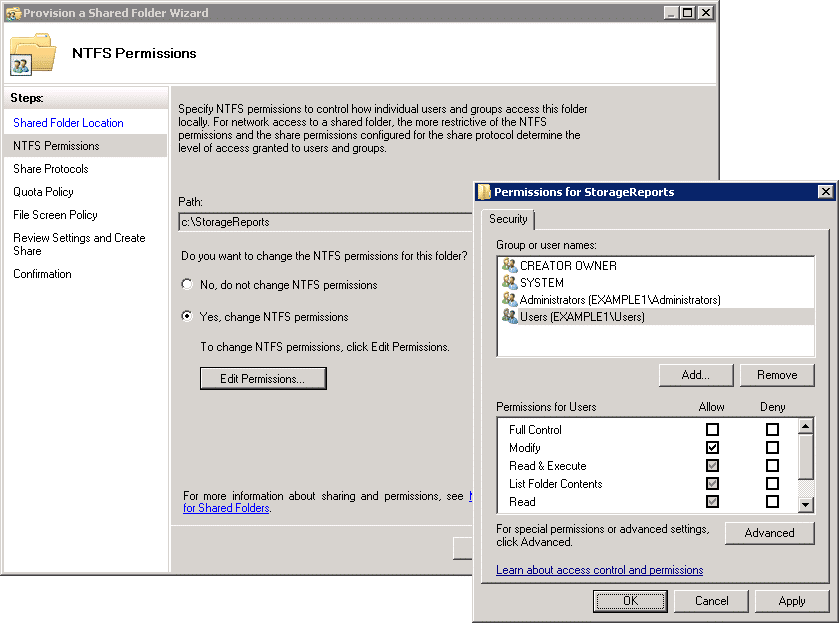
- Whenever you open access to a resource, you should limit the number of people who can access that resource to only those who need access. On the NTFS wizard permissions page, you can keep the default NTFS permissions or change the permissions to your liking.
- Now, you will be asked to choose the protocol(s) you want to access the share. Next, you can choose to install the NFS portion of the file server or SMB. Finally, you will notice that a Share name field is by default populated with the folder’s name you have selected.
- If you select SMB, you need to describe the share on its settings page to let people see it while browsing the server.
- You need to go to the SMB Permission Page to decide how you want your users to access the resource over the Network.
- Move to Quota Policy Page to apply a quote templated you have created with the File Server Resource Manager tool.
- Lastly, review all your selections and click the create button. After that, choose the Shares tab from the core console.
To View And Manage User Access To Shared Resource
After making your file server entirely up and running and you have allowed users to access the system, it is now time to perform administrative tasks to keep the server in a precise working condition. This way, you will see the list of users accessing your server and what they are accessing. You can also disconnect users if you find it suspicious. You can accomplish every task with the help of the Share and Storage Management Tool.
The main page of the console contains Manage Sessions and Manage Open File Options. Manage Section is a page that provides you information about the users’ overall access to your share. On the contrary, Manage Open File lets you see which session has which file open.
Furthermore, you need only one session when a user has seven files open from his desktop. However, if the same user goes to another computer and opens a server-based file, another session is created for that user.
Conclusion
With the Share and Storage Management Tool, you can manage two of the most significant resources via a centralized location. These resources are either folders and volumes shared on the network or volumes in the disks and storage subsystems. And, with Windows 2008, Microsoft has made numerous improvements to the File Service role. In addition to improved management capabilities, Microsoft has also improved the underlying SMB transfer mechanism to provide better performance with Vista.
Share & Storage Management for Windows Servers FAQs
How can organizations monitor and optimize storage usage on Windows Servers?
Organizations can monitor and optimize storage usage on Windows Servers by using tools such as Disk Cleanup, Disk Defragmenter, and the Resource Monitor.
What are some common issues that can arise when managing shares and storage on Windows Servers?
Common issues that can arise when managing shares and storage on Windows Servers include access and permission issues, disk space limitations, and performance issues.
How can organizations troubleshoot issues with shares and storage on Windows Servers?
Organizations can troubleshoot issues with shares and storage on Windows Servers by using tools such as Event Viewer and Performance Monitor, and by reviewing logs and error messages.
How can organizations create and enforce access policies for shares and storage on Windows Servers?
Organizations can create and enforce access policies for shares and storage on Windows Servers by using tools such as the File Server Resource Manager, and by configuring user and group permissions.

